Welcome to pStarE manual page.
I'm making this page, not finish.
Apr. 4, 2002 (start)
Jan. 20, 2003(cont.)
Apr. 29, 2004(cont.)
There are two way of installation. One is "Using installer". Another is "Copy files".
Using Installer
There are two installers. One is for program (executable). Another is for data.
Please download them from my web page (Click Here!)1.Extract them (downloaded files). setup.exe (each zip file) will be appeared.
2.Connect BE-300 to PC. Invoke the Synchronize-program on your PC.
3. Invoke setup.exe (for program and for data)This way sometime make a error (It's not enough memory). If you encounter this, please use "Copy file".
Copy files
There are two files. One is for program (executable). Another is for data.
Please download them from my web page (Click Here!)1. Extract it (data zip file) into "My Documents\pStar" folder in your PC.
2. Connect BE-300 to PC. Invoke the Synchronize-program on your PC.
3. Copy the pStarE.exe into "Program files\PIE\" folder in your BE-300.
4. Copy the "My Documents\pStar\*.*" into "My Documents\pStar\" in your BE-300.
Please download program (Click Here!).
Please download data file (Click Here!) as simpledata.zip
Please refer above "Copy files" in BE-300 installation.
Please make the short-cut-link of pStarE.exe, and copy
into \Windows\Start menu\.
Invoke pStarE.exe
The constellation chart screen with planets only is appeared.
After a few seconds, the share-ware dialogue is appeared.
After a few seconds. the message box is appeared ( "Select the
Data file").
Push OK. Then the file-selection-dialogue is appeared. You must select "pStar"
(pStar.be3).
If you can not find it, you did not install the data file under "My Documents"
folder. ==> To Exit.
The message box is appeared " Please exit program, once". Push "OK".
On share-ware dialogue, push "agree" button.
The LIC-KEY dialogue is appeared.
push "close" button.
The message box is appeared " The LIC-KEY was canceled. Do you
try this program ?".
Push "NO" button.
The pStarE is terminated.
Please re-invoke pStarE.exe
---------------- following steps will be appeared on each invoking until entering the LIC-KEY.
The constellation chart screen with all stars is appeared.
The share-ware dialogue is appeared.
Push "agree" button.
The LIC-KEY dialogue is appeared.
Push "close" button.
The message box is appeared "The LIC-KEY was canceled. Do you try this program ?".
Push "Yes" button.
---------------
Please set your region and local time.
Select MENU-set-Area
The Area-setting dialogue is appeared.
Enter "Your city or Area name"
Select latitude, longitude and local-time. (not supported summer-time).
You can seek your latitude and longitude at
http://www.pwrc.usgs.gov/bbl/resources/uwebsites.htm
{by Will (Fairbanks Alaska)}
Push "OK"
Select MENU-tool-Set Now
The constellation chart board view is updated on current time.
The position of Sun and/or Moon is OK ? (Sun is white circle, Moon is green circle)
--------------------------------------------------------------------------------
I recommend follows settings, first.
Use the extend tool bar. Select the "MENU-set-add tool bar". See Tool bar
Set Option, see Option Setting.
Set color setting see Color Setting.
--------------------------------------------------------------------------------
Push "Cancel" button on the file-selection-dialogue. Then the
message box is appeared ("Retry ?").
Please push 'NO' button.
On share-ware dialogue. Push "agree". Then LIC-KEY dialogue is appeared. Push "close" button.
The message box is appeared, "The LIC-KEY was canceled. Do you
try this program ?".
Push "NO" button.
Then exiting program.
Select MENU-set-Option
Almost parameters and settings can change in tool bar and/or extend tool bar.
No tool bar item ===> * mark
 Option 1
constellation name (show constellation name)
Mag.3 (show magnitude 3 or more)
Sft (Drawing shift parameter for magnitude 1/10 unit) e.g. -10 4.5Mag => 3.5Mag
*wide (Drawing expand parameter 10 is 1.0) e.g. 13 => 130% wide.
font (Drawing font size 75 is 7.5 points)
*no sand-clock (Not show sand-clock while drawing)
*remember last screen
*Use action key menu ( If you push "Enter" key or Action-Key, the menu will be appeared)
square view ( for direction view, show square to horizon)
*no area name (usually, area name is shown in left-low screen)
*not use 90 mode ( don't use full direction view = only use High, Middle and Low)
*stretch for JPEG picture ( For the Messier catalog JPEG, fit to your screen or not, the stretch function is not good in the Windows CE.)
*Enable cursor key ( If your PDA has cursor button, Please check on)
*right arrow is make to left ( If you checked on "Enable cursor key", please check on too.)
 Option 2
*not show const. in chart mode ( don't draw the constellation picture line in the chart mode)
*up to 2Mg in chart mode (draw stars up to 2 magnitude in the chart mode)
color moon ( Please check off)
Waning moon (Please check on)
No Sun and no moon (Please check off)
No Planet (If you want)
tap-Planet JPEG picture (If you prepare the JPEG file for the planet as "Jupitor.jpg", please check on)
show planet name (If you want)
show bright star name (If you want)
show messier num (Show Messier Number)
tap-Messier JPEG picture( If you want)
 Option 3
Tap User's Text (See User's Tap)
Tap Execute User's pos. (See User's Tap)
No confirm after find dialogue (Please check on)
Zoom: Auto Enter key (Please check on)
Zoom: Tap is navigation bar (Please check on)
Zoom: Use Center mark (Please check on)
Full Screen (no need this time)
Allocate memory for line buffer ( 5% decrease for drawing time, but need much memory)
tapping-font 130% (I think no need in English version)
not red wall (See red-view)
graduation color sky (Please check on)
400 ( Zooming size)
Mag.5 ( up to 5 magnitude)
-40 (shift refer above : sft)
500 (default zooming size)
Select "MENU-clr-color selection" or
![]() (tool bar button)
(tool bar button)
Operation procedure.
1. Select the color item name.
2. Change the color by R,G,B bar. It shows the new color to the right half area in sample color box.
3. Push "Update" button. (Don't miss it)
4. Select another color item name.
--------------------
| Item name | Comments |
| conste. Pict | constellation picture line color |
| Messier | Messier display color |
| day light (night) | In the chart, night sky color |
| day light (dark) | In the chart, dark sky color |
| day light (day) | In the chart, day sky color |
| text | general text color |
| planet text | planet text color |
| gradation1 | direction view top of the sky |
| gradation2 | direction view middle of the sky |
| gradation3 | direction view bottom of the sky |
| gradation4 | direction view horizon of the sky |
| equatorial coordinate | |
| horizontal coordinate | |
| conste. name | constellation name text color |
| star name | star name text color |
| direction | direction text color |
| polar mark | polar mark X color |
| basic wall | In the chart wall color |
| Sun text | Sun text color |
| planet text | planet color |
| conste. line | constellation line color |
| add-in line | add-in line color |
| star name | star name color |
| moon | moon color |
| ecliptic coordinate | |
| tracer | telescope tracer color |
| User's tap text | user's tap registration mark color |
| 1,2,3 | |
| milkey way | milkey way color |
| NGC IC | NGC IC add-in color |
![]()
Normal Tool bar
Extend tool bar
![]()
![]() Tool bar control (select or next)
Tool bar control (select or next)
![]()
![]() Tool bar control (next, prev.)
Tool bar control (next, prev.)
![]() coordinate (horizontal)
coordinate (horizontal)
![]() constellation chart view
constellation chart view
![]()
![]()
![]() always display (constellation name, line, picture line)
always display (constellation name, line, picture line)
![]()
![]()
![]() "tap" display (constellation name, line, picture line)
"tap" display (constellation name, line, picture line)
![]() "tap" display (messier
JPEG picture)
"tap" display (messier
JPEG picture)
![]() "tap" menu on
"tap" menu on
![]() no direction change when
"tap". If you not check, move to screen when you tapped in the screen.
no direction change when
"tap". If you not check, move to screen when you tapped in the screen.
![]()
![]() shift the magnitude =>
increase, decrease.
shift the magnitude =>
increase, decrease.
![]() large display (star)
large display (star)
![]() bright display (star),
check on "reflect type LCD", check off "transparent type LCD".
bright display (star),
check on "reflect type LCD", check off "transparent type LCD".
![]()
![]() text font size change,
large<=>small
text font size change,
large<=>small
![]()
![]() city lights change
city lights change
![]()
![]() display level magnitude change
display level magnitude change
![]() open color dialogue
open color dialogue
![]() waning moon
waning moon
![]() show Moon/Sun
show Moon/Sun
![]() show planets
show planets
![]() show planets by text
show planets by text
![]() show star name
show star name
![]() show messier name
show messier name
![]() show center mark
show center mark
![]() show day light
show day light
![]() change to red-screen
change to red-screen
![]() change to black/white
change to black/white
![]() change to white/ black
change to white/ black
![]() enable blue
color
enable blue
color
![]()
![]()
![]()
![]() select direction
select direction
![]()
![]()
![]()
![]() select High, Middle, Low sky
select High, Middle, Low sky
![]() horizontal display
( ground line is straight or ellipse)
horizontal display
( ground line is straight or ellipse)
![]() display the "User's tap" see "USER_TAP_POPUP_MENU"
display the "User's tap" see "USER_TAP_POPUP_MENU"
![]() show messier
mark
show messier
mark
![]() draw
equatorial coordinate
draw
equatorial coordinate
![]()
![]()
![]()
![]() move view position
move view position
![]()
![]() Zoom control
Zoom control
![]() Zoom navigator
Zoom navigator
![]() Into
Zoom mode
Into
Zoom mode
![]() Find a star
Find a star
![]() telescope popup menu
telescope popup menu
![]() tap popup menu
tap popup menu
![]() telescope dialogue
telescope dialogue
![]() today's info.
today's info.
![]() planet screen
planet screen
![]() polar adjustment screen
polar adjustment screen
![]() direction screen
direction screen
![]() top of the sky screen
top of the sky screen
![]() setting
longitude, latitude
setting
longitude, latitude
![]() setting
new time
setting
new time
![]() select constellation
showing
select constellation
showing
![]() to
enter location
to
enter location
![]() set
now (PDA time)
set
now (PDA time)
![]() auto update (by 1
min.)
auto update (by 1
min.)
![]() start timer update (by setting time)
start timer update (by setting time)
![]() open setting time
dialog
open setting time
dialog
![]() one
hour later
one
hour later
![]() one hour ago
one hour ago
![]() 10
min. later
10
min. later
![]() 10 min. ago
10 min. ago
![]() start
telescope control. you must select auto update mode
start
telescope control. you must select auto update mode
![]()
![]() to left telescope
to left telescope
![]() to
right telescope
to
right telescope
![]() to up telescope
to up telescope
![]() to
down telescope
to
down telescope
![]() high speed telescope
high speed telescope
![]() low
speed
telescope
low
speed
telescope
Sorry, this program can control "Auto Star" that is made by Vixsen telescope only.
How to open this dialog...
1. Select tool bar button
![]()
You can operate "High", "Middle", "Slow", "Up", "left",
"right", "down" to telescope via "Auto Star".
2. Select tool bar button ![]() ,
and then select "Open TSC" menu that appeared by tap and hold a star.
,
and then select "Open TSC" menu that appeared by tap and hold a star.
You can operate all button in above dialog.
High: same
![]()
Slow: same ![]()
Left: same
![]() to left telescope
to left telescope
Right : same ![]() to right telescope
to right telescope
Up: same
![]() to up telescope
to up telescope
Down: same ![]() to down telescope
to down telescope
Keep mind, while using telescope control, please check
![]() (auto update) mode,
because the telescope can not slew to the star in under ground.
(auto update) mode,
because the telescope can not slew to the star in under ground.
There are ".p91" files in "My Documents\pStar".
It's constellation text. It's a text file, but extension
is not ".txt".
You can change it easier on your PC by notepad.exe.
Please keep mind follows.
1. Do not include CR, LF code
2. File name is constellation name + ".p91"
e.g. and.p91, ant.p91, aps.p91, ...
3. Can not display too big size (Only one screen, no paging)
There are ".jpg" files in "My Documents\pStar"
You can replace these "jpeg" file.
Please keep mind follows.
1. File name is "Mn.JPG", n is messier catalog number.
e.g. M1.JPG, M100.JPG, ...
---------------------------------
About Planet JPEG
If you want to replace the planet jpeg file, you can replace
"My Documents\pStar\xxxx.JPG", xxx means planet name.
e.g. "Jupiter.jpg", "mars.jpg", etc.
You can replace easy, use the Internet, searching the jpeg file by search engine, browsing a jpeg file, save the jpeg file as "xxxx.jpg", and then move to "My Documents\pStar" folder in your Pocket PC.
But I recommend to use photo processing application program, please stretch jpeg size (WxH = 240x260)
How to open this dialog? See
![]() "USER_TAP_POPUP_MENU".
"USER_TAP_POPUP_MENU".
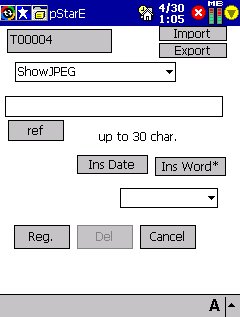
You can register the tap point. We call "User's Tap" point. "User's tap"
point has "comment" and "action". You can select "action" of "Show JPEG",
"Execute Program", "Show Add in" or "Show Text". Please select
![]() ,
then show the "User's tap" point, and you can tap it, pStar will do "action".
,
then show the "User's tap" point, and you can tap it, pStar will do "action".
action
"Show jpeg" : push "ref" button in the dialog, select a
jpeg file (extension is ".JPG")
"Show Add in" : push "ref" button in the dialog, select a
".p91" file ( ASCII text file)
"Show Text" : no meaning, that text will be appeared with
"User's tap" position.
Import and Export function is enabled by "register" mode, disabled by "change/delete" mode. I missed to disable the buttons.
Import : Load "User's tap info". (please select register in the menu)
Export : Save "User's tap Info". (please select register in the menu)
This point information keeps equatorial coordinate only.
We prepared add in data files.
add in files have ".pxx" extension. So, constellation text file is ".p91" file. It's one of the "add in" data file.
procedure
1. select menu "tool" > "add in"
2. check "show", for enable "add", "delete" button.
3.select ".pxx" file, but do not select ".p91" constellation
text.
e.g. winter_tri, summer_tri, springt_tri, poler_cas
Milkey.p92 is milkeyway data.
4. Push OK, then close the dialog.
After selecting the "add in" data file, the pStar will be
display the data on your PocketPC.
(Sorry, the text data may be Japanese)
![]()
MENU-tool-add-in
see
Add-In.
MENU-tool-find
The object list will be appeared, please select object, and push OK.
The pStar will be show that in zooming view.
MENU-tool-Use TSC, Stop TSC
Use TSC : (Telescope controller is disabled)
Stop TSC : (Telescope controller is enabled)
MENU-tool-Open TSC
Open the Telescope Controller dialogue. See
MENU-tool-SetNow
Set pStar time to now.
you can change the time which you want.
see MENU-set-Date,Time
MENU-tool-auto clock
If you checked this item, you can not change the time.
The pStar will update the time from Windows CE clock automatically.
MENU-tool-Select interval
If you select this item, the interval-time dialogue will be appeared.
You can select a interval timer value which is shown in combo-box.
MENU-tool- ? +
? is selected in the interval-time dialogue.
If you select this item, the pStar time is increase ? minutes/seconds/hours
MENU-tool- ? Tick interval
? is selected in the interval-time dialogue.
If you select this item (check on), the pStar will start ticking the interval timer.
If you want to stop ticking, please re-select this item. (check off)
MENU-tool-overwrite
You select this item (check on),
And then you select ' MENU-tool- ? Tick interval'
The pStar will draw the stars without refresh screen.
Then, you can see tracks of the star. (recommend set interval to 3min.)
MENU-scr
Select the screen (view) mode.
MENU-scr-Zoom , Zooming
(check on)=>Change to Zoom mode.
MENU-scr-top of the sky
(check on)=>Change to Top of the sky view
MENU-scr-direction screen
(check on)=>change to direction view.
MENU-scr-chart screen
(check on)=> change to constellation chart view.
MENU-scr-poler screen
(check on)=> change to polar view.
The telescope must be adjusted to polar-point.
This view is zoom-up the polar and specular mode.
MENU-scr-Planet screen
(check on)=> change to planet view.
For seeing the planet, the pStar do not draw the planet's size in the screen. Please confirm the planet is far or not far from the Earth.
And the pStar do not draw correct distance to the Sun in this screen.
MENU-scr-Today
Show the Sun, Moon and planets information. e.g. sun-set time, sun-rise time, etc.
MENU-scr-Save screen as JPEG
Save the screen as JPEG-file into your BE-300.
Copy screen to JPEG file.
draw the low position of the sky.
MENU-dir-45
draw the middle position of the sky.
MENU-dir-60
draw the high position of the sky.
MENU-dir-90
draw the sky from 0 deg( horizon) to 90 deg( top).
MENU-dir-North
draw the North side.
MENU-dir-West
draw the West side.
MENU-dir-South
draw the South side.
MENU-dir-East
draw the East side.
MENU-set-Area
Select the region (area) which you are standing.
Needs latitude and longitude.
MENU-set-Date,Time
Select the date-time which you want.
If you want to set Date and Time, you must check off MENU-tool-auto clock item.
To restore to PocketPC's time, please click.
MENU-set-option...
see
MENU-set-add tool bar
(check on) the pStar will show the new tool bar.
I recommend check on.
MENU-set-day light
(check on) the pStar will draw the day-light as wall color.
MENU-set-no tap direction
(check on) you can tap in the view, not moving direction.
(check off) If you tap in the view side, the view will move.
MENU-set- tap-conste.pict.
(check on) If you tap the star, the constellation picture line included it will be appeared.
After 5 seconds, it will be disappeared.
MENU-set- tap-conste.line
(check on) If you tap the star, the constellation line included it will be appeared.
After 5 seconds, it will be disappeared.
MENU-set tap-const.name
same as above, the constellation name will be appeared.
MENU-set tap-menu:view
(check on) If you tap and hold in the view, the
VIEW-POPUP-MENU is appeared.
MENU-set tap-menu:User's
(check on) If you tap and hold in the view, the
MENU-set tap-menu:telescope
(check on) If you tap and hold in the view, the
select teh always draw item.
MENU-view-User's tap
draw the User's TAP item.
MENU-view-Messier
draw the Messier catalog.
MENU-view-conste.name
draw the constellation name.
MENU-view-const.pict
draw the constellation picture line.
MENU-view-const.line
draw the constellation line.
MENU-view-polar
draw the polar star as X mark.
MENU-view-zoom navigator
show the zoom navigator in zoom-mode( view).
MENU-view horizontal coordinate
draw it.
MENU-view equatorial coordinate
draw it.
MENU-view-ecliptic coordinate
draw it.
MENU-view-milky way
draw it (needs milkey.p92 file)
color setting
MENU-clr-Red view
draw red-view
MENU-clr-BW view
draw Black/White mode.
MENU-clr-WB view
draw White/Black mode.
MENU-clr-Color
color star or white star.
MENU-clr-increase size
The star size will be large.
Which mode do you like ?
MENU-clr-increase brightness
The star bright level be brightness.
Which mode do you like ?
MENU-clr-validate blue
pStar can not show blue-color-star. If you want to see the blue-light, please check on. But your eye can not see the blue-light-star, blue-light is reflect to photograph only.
MENU-clr-color selection
show the color selection dialogue.
Please select the color which the pStar used.
You can customized the colors. (excluding star color).
Please change any color which you want.
Don't forget "push Update button each selection".
Almost item is same as normal MENU. And please guess the function.
How to show this menu ? MENU-set-"tap-menu:User's", and then tap and hold any position.
register: Open "User's tap" dialog, see
![]() User's
Tap.
User's
Tap.
You can change/delete your "User's tap" point. Please tap and hold a "User's tap" point, the menu will be appeared, select change/delete.
1,2,3: it will show a square character.
Draw 1, 2, 3 mark on the view, These are used by marking (memo).
Slew
Control the telescope into the "tap & hold position" before showing this menu.
Trace
Check the telescope position, the pStarE will draw the telescope position mark.
Open TSC
Open the telescope controller dialogue. See
Others
Same as normal menu.
--------------------------------
Copyright (c) 2002-2003 P.I.E. Ltd. JAPAN